How to Make Ableton Live Sound Better

For many years I used Pro Tools as my main DAW – sequencing with hardware and then recording the audio. And while this sounded really good, I found that it was extremely difficult to be creative with timing, arrangement, and performance once my audio was recorded into the arrangement. Shifting around samples for hours until it sounded good, and copying / pasting that same kick drum 500 times started to wear me down.
So I switched to doing the majority of my production in Live (still using a lot of hardware). I read the entire manual, and was extremely excited about the new possibilities the program offered. I went head first into Ableton and haven’t looked back since – it has not only changed the music I make, but has given me a deeper understanding of timing, envelope shaping and many other things.
BUT. The hardest thing for me was dealing with sound quality issues. At first I vowed to never warp anything, refused to consolidate audio, and basically avoid all the processes that detracted from audio quality. Unfortunately I soon discovered these processes also detracted from Live’s best features. So I gave up being a paranoid audio engineer and, embracing creativity over sound quality, began using and loving all of these once dreaded functions. I found that Ableton instantly became an even more powerful DAW. Luckily I also learned some tricks along the way to help maintain high quality audio.
1. Use This mode of Beat Warping for Drums
Coming from an MPC background, I had previously found that pitching a drum track up or down was the best way to change the sample’s speed without affecting sound quality. But for some reason, Ableton’s pitching just does not sound great to me. It seems that the transients and punch of the drums are affected in an undesirable way, plus you’re essentially pitching drums up or down when this is not always what we want.
- Default beat warping in Live seems to do something very negative to the transients. It attempts to fill in the silence between drum hits by reversing the end of a beat if it is not long enough. In short, this reduces punch.
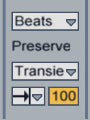
- If you instead use the above mode of beat warping, you will find that 90% of the time you can get punchier and totally acceptable warping. For me, this mode is closest to what I used to do in Pro Tools (chopping up beats, and aligning them to the grid without changing their length).
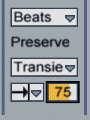
- Using this mode, you now have direct access to the decay of each drum hit with the following parameter (shown below). This is an extremely useful tool to tighten up a vinyl drum break that’s surrounded by too much noise and hiss, for instance. A release time of 75 is shown below – try dialing back the release and listen to how much tighter and drier it makes the drum break (Imagine if this could be automated!)
2. Use the Utility Plugin to Make Your Kick & Bass Mono
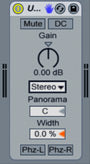
It is frustrating to me that Ableton doesn’t really allow you to have mono tracks. When mixing, you may want to try having your kick, bassline and even snare in mono – it provides for a powerful low end and punch, and allows space for synths, vocals, stereo claps and more.- Place one Utility Audio Plugin on each of your kick, bass and snare tracks.
- Set the width on each instance of the plugin to 0.
3. Session Sample Rate = Sample Library Sample Rate
Sound redundant and confusing? It’s not. Whenever you convert sample rate, you are potentially introducing distortion and audio artifacts. While this may be very slight, avoiding it can be such an easy fix it’s a no brainer. Keep in mind this applies only to people who are using samples, but if you’re in Ableton I think it’s safe to assume that’s you
-
Browse your most used drum and synth samples folders, and determine what sample rate the majority of your sounds are. On a Mac you can right click and get info. Our drum samples (and most) are at 44.1 kHz.
- Go to Ableton Preference, Audio, and make sure your session sample rate is the same as the majority of your plugins. Make sure you’re at 24 bit audio as well:
4. Use Headroom When Recording and Mixing
This goes for all DAWs, but it should still be said here!- If the samples you are using are very loud, you may want to insert a Utility Audio Plugin to reduce the gain by about -5 or -10dB. This will allow you to add plugins and increase gain without clipping. Lowering the channel fader is not the same thing! This is precisely why all of our samples have headroom.
- If you are using samplers, drum racks, and complex insert routing, make sure that you have enough headroom from start to finish, and insert that utility plugin where needed. In some cases, lowering the volume of a drum rack’s chain may also be effective, but be careful if you have a plugin on the chain.
- Make sure no tracks are clipping. Since Live uses post fader metering, you’ll need to set your channel at 0 and look at the meter. Is it in the red? Use that Utility Plugin!
5. Record in Ableton, Mix in Pro Tools or Logic
In my opinion the summing in Ableton sounds inferior to Logic and Pro Tools (insert other DAWs here as well, I can only speak from my own experience). While I don’t have exact technical reasons, and can admit there is a lot of debate about this, to me the panning algorithm and stereo separation (or lack thereof) are major reasons not to mix in Ableton.- Record, create, produce and write in Ableton. Get a great sounding mix going without many plugins.
- Export all tracks un-dithered, at 24 bit, the same sample rate you recorded at.
- Import the tracks into Pro Tools, Logic, or another DAW you are comfortable with.
- Hear your tracks come to life and take it a step past what was possible in Ableton!
In the End…
In the end these are minor changes, but if you employ them all you should start hearing a positive change in the quality of your productions. Does anybody else have any tips for getting great sound out of Live? Did I say anything you disagree with?Next →
← Previous


